Recent Posts

Saturday, December 18, 2010

The Beginnings of Tradition

Since I think I expressed my adoration for this time of year earlier, I wont bother with reaffirming those sentiments once again. Instead, I think I'll offer for your close approaching Holiday pleasure, what is quickly becoming a tradition in our home, an annual Bûche de Noël, aka a Yule Log.

 The Bûche de Noël is closely related to (or has almost replaced) the tradition of the "Yule Log," when the carefully selected Christmas log was burned to bring warmth and prosperity to the home. Although it's now used in relation to Christmas traditions, it had its origins in a "Winter Solstice" tradition.  Some traditions suggest the yule log was burned with the remnants of last years log, while others suggest the 'log' was actual a bundle of sticks tied together, and as each binding broke they toasted with a beverage. There were apparently many variations of the Yule Log, but as people slowly replaced the hearth with other forms of heating in many countries, the tradition slowly declined and was replaced with the edible cake version.

The cake itself is typically prepared using some sort of sponge cake, buttercream frosting, and various decorations possibly including branches, fresh berries, meringue mushrooms, and powdered sugar. Once iced, the log is usually sliced and placed on the side or top as another branch. I didn't want the cake to dry out (and what's wrong with more chocolate!), so I iced this piece as well.

We had our first version of the Bûche de Noël a couple years ago as part of our Christmas Eve / Dad's Birthday celebration, and have managed to find an excuse to make a new one each year since. The extra dose of sweet from chocolate ganache I use to top the log makes for an exceptionally sweet dessert that looks nice and festive sitting on the table with just a little extra adornment.This is by far the most enjoyable recipe of the three that I've tried, so I thought it an appropriate time to share it with you.


For the Cake:
1/4 cup water
1/3 cup Dutch-process cocoa powder
1 teaspoon vanilla
3 large egg yolks
2/3 cup sugar, divided
1/2 cup flour
4 large egg whites
1/2 teaspoon cream of tartar

1. Preheat oven to 425. Line a jelly roll baking sheet with a 17" x 10-1/2" with parchment paper. Butter & dust with flour. 
2. Boil water. Pour over cocoa and begin to stir. Add vanilla and continue to stir until smooth.
3. In a separate bowl, combine egg yolks and 1/3 cup sugar. Beat until smooth and pale yellow. Add chocolate mixture and beat until smooth and well combined.Add flour and beat one more minute.
4. In a clean bowl, beat egg white until soft peaks form. Add cream of tartar and sugar and beat until it holds stiff, glossy peaks.
5. Using a spatula gently fold 1/2 of meringue mixture into chocolate. Gently fold in remaining.
6. Using a pastry bag with wide tip (or coupler), place mixture into bag and pipe in long rows filling the prepared pan.
7. Bake cake 8 minutes, until it springs back when touched in the middle.
8. Remove from oven and place on a rack to cool. Place a damp towel over the cake. When cool, invert it onto the towel and gently peel parchment paper away.

For the Filling  Icing:
1 Stick Salted Butter, at room temperature

1/2 Tsp Pure Peppermint Extract
1/2 lb Powdered Sugar
3-4 Tbsp Milk
2 Tbsp Dutch Process Cocoa

1. Cream butter. Add flavoring. Add cocoa, powdered sugar a 1/2 cup at a time adding milk when needed to achieve desired consistency.

For the Ganache (outer frosting):
1-1/4 Cup Heavy Cream
10 Oz Semi-Sweet Chocolate finely chopped

1. Bring heavy cream to a boil. Pour over chopped chocolate and stir until smooth. Chill covered, and stir occasionally until set.

For the decorations, use your imagination! You can sift powdered sugar over the cake and make Meringue Mushrooms as I did here, or you can do whatever suits you, your guests, and your Christmas or Holiday wishes.

Enjoy!

Sunday, December 12, 2010

Seasonal Faux Pas

I know we all have predicaments of craving a dish that is far from seasonal but sounds amazing at the moment. I got home from work the other night and was really thinking about some perfectly cripy edged and melting buttery-centered crab cakes. I have been to Baltimore and sampled some excellent specimens and some that were subpar, but the object of perfection in my opinion has a hint of sea saltiness, a bit of an herbal note, and a hit of spiciness to balance out the richness.

With the impending snow on the way, that is now piling up, I had crab meat up to my wrists and the scent of Old Bay wafting around the kitchen. I have been dabbling in curing over the last couple months with a simple bacon and pancetta under my belt and dreams of a meat grinder in my near future. The herbal salty kick of the pancetta  with crisp edged crab cakes resting atop a thin sliced tomato seemed like an excellent dinner, even with the snow flinging itself against the windows.
Sriracha Bay Crab Cakes
1 # crab claw meat
1 1/2 T mayonnaise
1 tsp mustard
1/2 tsp sriracha chili sauce, or to taste

7 T buttered cracker crumbs, such as Ritz
1 tsp Old Bay seasoning, plus more for garnish
1/2 tsp dried oregano, plus more for garnish
1 egg
1/2 tsp Worcestershire sauce

3 oz. pancetta sliced into batons
canola oil for frying
2 tomatoes thinly sliced

Mix all the crab cake ingredients together and form into patties the size of the tomato you are serving them with (about the circumference of a baseball seems just right). Stick the cakes onto a sheetpan in the freezer for 20 minutes to chill enough to make them maintain shape. Fry pancetta for about 3 minutes in a cast iron skillet, or until a deep mahogany shade and remove, leaving drippings in pan. Add enough oil to fill pan 1/2 inch deep. Fry crab cakes until they are a crisp pecan brown, regulating heat until it warms the cakes all the way through when both sides are crisp. Serve crab cakes over a tomato slice with pancetta cracklings on top sprinkled with oregano and Old Bay. Enjoy.

Wednesday, December 8, 2010

It's the Hap-Hapiest Season of All


Christmas is undoubtedly my favorite time of year. There's so much to enjoy and to do from decorating the tree, decorating the house, enjoying a plethora of Christmas movies, making homemade gifts (a tradition in our home), putting gingerbread houses together, wrapping presents, Christmas parties, get-togethers and events. You have so many more opportunities to reach out into you community in some way, and people are for the most more giving and kind than any other time of the year. And of course, let's not forget the food. The cookies, the candy, the egg nog, Christmas Eve dinner for my family (with my Dad's birthday on Christmas Eve), Christmas morning goodies, and finally Christmas Dinner. Yes, my jeans are groaning as I write this. 

The only problem (if you even want to call it that) that arises with the holidays is there just is never enough time to try and squeeze in absolutely everything you want to do or try. I probably have a list of a hundred different peppermint Christmas treats I want to try, not to mention dozens of cookies and candy recipes. There is just no time to try every new holiday recipe and still enjoy the holidays. I guess sometimes, you can either just choose to settle with only three types of Christmas candy (instead of seven), or you could throw in a couple of these quick Christmas Candy treats. 

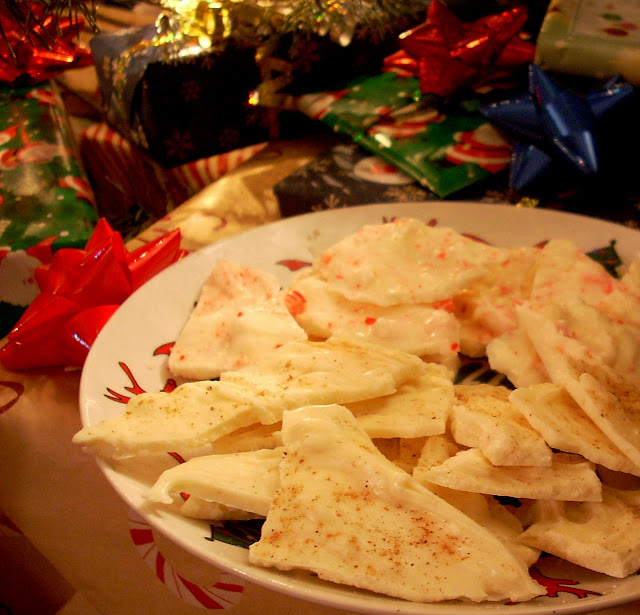
I’m not sure why, but I have never made peppermint bark. Never. I’ve enjoyed it plenty over the past few Christmas holidays, but never actually made it myself. So, over the weekend we were booked with Christmas related plans and I thought I would make a batch to tote along on our festivities. Low and behold, when I consulted my trusted candy guide, candy thermometer laid out and ready to go, I quickly discovered that this is probably the easiest candy in the world to make. The hardest part is probably breaking up the candy canes. It's so easy, in fact, that at Daniel's suggestion for an additional version, I quickly whipped up this "Egg Nog Bark" to enjoy as well. Safe for the kiddies, don't worry. 

Peppermint Bark

1 12 oz bag white chocolate
About 3 regular sized candy canes, crushed
½ tsp peppermint extract
1.      1. Line baking sheet or glass baking dish with wax paper.
2.      2. Carefully melt chocolate (over low heat or preferably in a double-boiler), being careful not to scorch.
3.      3. Once melted, add peppermint extract and a handful of crushed candy canes (less than half).
4.      4. Carefully pour chocolate mixture on wax paper lined sheet or dish. If necessary, carefully spread to even out slightly. Quickly top with remaining candy cane bits.
5.      5. Allow to set (15-20 minutes). Break apart, and enjoy!

To dress it up, first melt 1 (12 oz) bag of chocolate (milk/dark/semisweet your choice), adding ½ tsp peppermint extract and pour into wax paper lined glass baking dish. Follow above directions, pouring mixture on top of regular chocolate.

 
Egg Nog Bark

1 12 oz bag white chocolate
2 tsp nutmeg, divided*
1 tsp rum flavoring

1.       1. Line baking sheet or glass baking dish with wax paper.
2.      2. Carefully melt chocolate (over low heat or preferably in a double-boiler), being careful not to scorch.
3.      3. Once melted, add rum flavoring and one teaspoon of nutmeg.
4.      4. Carefully pour chocolate mixture on wax paper lined sheet or dish. If necessary, carefully spread to even out slightly. Quickly top with remaining nutmeg, using more or less as desired for appearance.
5.      5. Allow to set (15-20 minutes). Break apart, and enjoy!
6.       
* Typically, I’m a strong proponent of using freshly ground nutmeg. It’s relatively inexpensive and packs a strong flavor. BUT, in this case, because you are going to want to use more for appearance purposes, I would use a high quality ground nutmeg.

Last, but certainly not least, it wouldn’t be Christmas without fudge, and nor would it be Christmas without sharing a family story. Luckily, this recipe will give you both. 

Given my baking and all things sweet addiction, for our first Christmas together as husband and wife I went on a baking extravaganza, making peppermint fudge, chocolate fudge, tons of cookies, and tossing in this super easy peanut butter fudge for a last minute gift for co-workers. Our next Christmas together, on my first day of baking, I did not begin with all three fudges. Instead, I began with my assortment of cookies, and only had time to do a peppermint fudge. My sweet husband comes home and as I show him the gems of my days labor one by one, he looks perplexed and confused. As I show him the peppermint fudge (that is somewhat labor intensive I might add), he responds, “but I like peanut butter fudge.”

So, despite giving him a hard time every year for this incident, every year we also enjoy this super easy, takes-you-longer-to-do-the-dishes-afterward, peanut butter fudge.

5 Minute Peanut Butter Fudge

1/2 cup butter, plus more for greasing pan
1-1/2 cups peanut butter
1/2 cup half & half
2 teaspoons vanilla
2  pounds powdered sugar

1.       1. Grease 10x10 dish with butter.
2.      2. Pour all ingredients into a microwave safe dish.
3.      3. Microwave on high for three minutes.
4.      4. Stir well with a wooden spoon.
5.      5. Pour into prepared dish. Allow to cool and set.
6.      6. Cut and store in between sheets of wax paper in air-tight container.

Enjoy!

Tuesday, November 30, 2010

Winter Warmer


We are trying hard to take more pictures of our food. It is not that we quit cooking or thinking of you all. Quite the opposite in fact. It seems like ages since I have posted and talked to you all. As I was cooking a chili that would offset the cold weather, the memories of enjoyable dialogue and sharing with you all flooded back.


The more I contemplate chili and the way so many of us relate to it, from the simplistic homage to hormel to the offspring of time and effort with countless ingredients, the more mysterious and central it seems. The varieties are as countless as there are mothers as was evidenced at our church chili cook-off. Everything from vegan pumpkin to a spicy beef pomegranate version. It strikes me that chili may be as close to Indian food as any one of us have ever tried, at least without the beef. All the glorious mix of textures and spices are combined to create a dish as integral to our childhoods as it is warming in the middle of winter. It feels awfully good to be blogging again, and I certainly hope you can circle the table for a steaming bowl of chili in the near future.
Mahogany Port Chili

2 tsp. fresh ground coriander
1 T smoked paprika
1 tsp. vindaloo
8 deseeded and rinsed ancho chiles
5 deseeded and rinsed guajillo chiles
1 cinnamon stick
2 bay leaves
1 T sea salt
2 T cocoa powder
3 small yellow onions diced
4 garlic cloves minced
2 T raisins
1 15 oz. can black beans, drained and rinsed
1 15 oz. can kidney beans, drained and rinsed
24 oz. 85/15 ground beef
1 28 oz. can crushed tomatoes
3 T ruby port
2 T canola oil plus more for sauteing
2 T masa harina
3/4 C grated cheddar cheese for granish

Combine port, chiles, peppers, oil and raisins in a food processor. Pulse until pureed. Meanwhile brown the ground beef with the canola oil for about 6 minutes. Remove beef from the pot and saute the onion, garlic, and ground seasonings in the beef drippings until translucent, about 4 minutes. Add tomatoes, beans, beef, pureed chile paste, bay leaves, and cinnamon stick. Mix until a rich red color is achieved then add the cocoa powder to bring the chili to a dark mahogany color. Cover and simmer over low heat for approximately 20 minutes, stirring occasionally. Add the masa harina and stir to combine well adding a pinch more to thicken if needed. Enjoy with a sprinkle of sharp cheddar cheese.     


Friday, October 1, 2010

Memorable Meals

This month has been a whirlwind of activities other than blogging. In that category we are not doing very well, but I am attempting to rectify that with a pretty awesome pasta that is conducive to the hectic lifestyle. On the other hand, reading the newest Saveur with its 25 most memorable meals makes my mind go back to a time when I couldn't conceive the impact of food on my life. I am not sure whether any of you have thought about your most memorable meals but mine goes back to around the age of ten when seventeen of my Dad's family would gather every Sunday after church to eat lunch at my great-grandmother and great-grandad's house. The spread seems so enormous to me in restrospect from the fried venison backstrap, mashed potatoes and gravy, corn on the cob, green beans amply studded with country ham, steaming golden cornbread, an iceberg salad with garden tomatoes, mustard greens also studded with dark red bits of ham and garlic, crispy fried crooked neck squash, and plenty of ice cold tea and lemonade to go around. It seems unbelievable to think that we would sit down to a spread like that every Sunday or even sometimes Nanny's homemade deep fried taco shells just waiting to be filled with ground beef and tomatoes.


My love and respect of food has grown so much since then as I have realized the time and effort my eighty year old great-grandmother, Nanny, would put into such a feast. Since then I have eaten foie gras, duck prosciutto, escargot, and countless other delicacies that she probably had never even heard of. But the fact of the matter still remains that those incredible meals and every one in the future are always best shared with family and friends.


You might be asking yourself what a Southern man, with a rich heritage of individuals who were/are involved in small town politics, dairy farming, and steel and factory work, has doing opening a pizzeria. I have thought about that many times during the stages of planning and I think Frank Stitt of Bottega and Bottega Café in Birmingham, Alabama has hit the nail on the head. Italian cooking has a real kinsmanship with the Southern-American fresh ingredient mindset and sheer love of large family-style meals. I am still fleshing out some of my own embedded links between the two, but the more Italian/Southern food I prepare the more it feels right and I hope this dish rings true to you as well. No matter what your circumstance, food shared with family is one of the most elemental and extraordinary events.  


The other day I was tinkering around with a San Marzano tomato sauce and it certainly played an important part in the creation of the dish. Sometimes we are forced to be more practical than eccentric minded and often times it grounds me enough to create something amazing. Chickpeas also play a roll in this pasta venture because I had a can left over from purchasing too many for making hummus last weekend. Their versatility never ceases to amaze me and I am forever grateful. They are one of those canned ingredients that is every bit of as good as its dried counterpart.


Orecchiette works like a charm in this dish cupping the chickpeas and sauce as any marriage of pasta, ingredients, and sauce should. A hint of floral rosemary and a handful of diced potatoes thrown in while the sauce is simmering create a symphony in a flash. The porcine nuggets of Sopressata give that Southern/Italian umami combination that makes me feel right at home and hopefully you will agree. If you have a memorable meal you would like to share we would be glad to hear it. 


Pasta Sopressata


8 oz. orriechette
2 oz. sopressata, diced
1 C. homemade tomato sauce (mine was canned San Marzano tomatoes, garlic, salt, pepper, and a few rosemary leaves)
1 can chickpeas, drained and rinsed
1/2 C fontinella cheese, grated for sprinkling
1 sprig rosemary, leaves removed and finely chopped
4 garlic cloves, minced
1 russet potato, finely diced
1/2 C reserved pasta water
1 pinch dried red pepper flakes
salt/pepper
olive oil for drizzling

Begin sauteing the garlic and sopressata in a large saucepan. Meanwhile bring a large pot of salted water to boil for the orriechette. Cook orriechette three minutes shy of al dente and drain reserving the pasta water. Add the potatoes and chickpeas to the saucepan and cook together for another minute or so and then add the tomato sauce, rosemary, and pepper flakes. Once sauce has reduced a bit and potatoes are nearly done add orrecchiette and stir to combine. The sauce will be rather thick but add the pasta water by spoonfuls to make the pasta come together. Once the pasta sauce has reached the desired consistency taste and adjust seasoning lightly with salt and pepper. Spoon into shallow bowls or saucers and top with grated fontinella cheese and a drizzle of olive oil. This recipe makes enough for two or three but can be multiplied to be enjoyed with friends and family.

Tuesday, September 14, 2010

Braising and Business

The last month has been a whirlwind of activity and business for Dawn and I and I am sure that shows in our infrequent posts. Last weekend we visited The Greenhouse Tavern in Cleveland which is run by Chef/Owner Jonathon Sawyer, one of the 2010 Food&Wine top new chefs. The food was imaginative and superb, beginning with the complimentary country pork pate served with fresh baked bread to the deconstructed pan seared pork chop saltimbocca including country ham and pommes puree instead of the more traditional prosciutto and polenta. The dish truly shined with the addition of a maple glaze on the pork chop, but that gets me to the main reason why we have been so busy and infrequent in our posts.


We have been crunching numbers and researching over the last couple months in preparation of opening a small pizza venture here in Columbus. It is simultaneously nerve racking and exciting. Exciting because of the opportunity to bring extraordinary pizza to an area with a million pizza places and a mere handful of outstanding pies. Nerve racking because the economy is in the shape that it is. We are working on bridging the gap between locally sourced quality ingredients and affordability that customers are looking for in our modern time. But, I will not ramble on forever about the future when there is a dish I want to share with you.

I recently finished a book by Bill Buford titled "Heat: an amateur's adventures as kitchen slave, line cook, pasta maker, and apprentice to a Dante-quoting butcher in Tuscany," that resonated with me when I saw beef short ribs in the market. The preparations of meat that are prepared by Dario Cecchini are wonderful and foreign to me in their homage to Italian tradition. This foreignness could be the fascination toward the amazing cuisine of Northern Italy. I altered the slow cooked beef dish to incorporate short ribs with a similar focus on rusticity and the divine nature of slow cooking tough cuts.

One aspect that always draws me toward braising, other than the delicious melt in your mouth texture, is the simplicity. With a handful of ingredients, including beef short ribs, carrots, garlic, wine, milk, rosemary, red pepper flakes, butter, polenta, salt and cinnamon, magical things happen. The name of the dish is 20 Hour Short Ribs over Polenta and Cinnamon Brown Butter Sauce. I hope you will try it, even when you are strapped for time and don't feel like making something after work. It is snap to prepare the night before you are going to eat it. The oven does all the heavy lifting and you can sleep and go to work then pull it out of the oven in time for dinner with only a quick polenta and sauce to prepare.

20 Hour Short Ribs over Polenta and Cinnamon Brown Butter Sauce

1 1/2 - 2 # beef short ribs
2 carrots peeled and chopped in eighths
4 garlic cloves roughly chopped
20 oz. cabernet sauvignon  or other old world red
2 T dried rosemary
1 T dried red pepper flakes

Preferably brown short ribs for a few minutes in the pot you are going to cook them on the stovetop. If you are strapped for time you can skip this step. After you have browned the short ribs add the other ingredients, stir well, and arrange evenly. Transfer in the covered pot to a 250 degree oven for twenty hours checking once or twice to assure there is still a bit of liquid. After the liquid is nearly evaporated and the ribs are falling apart tender remove from the oven.
 
Cinnamon Brown butter sauce

8 T unsalted butter
1 T light brown sugar
2 tsp ground cinnamon
1/2 tsp sea salt

Melt butter until all the milk solids have evaporated then add the other ingredients and stir to incorporate dissolving the salt and sugar. Continue cooking over low heat until browned.

Polenta

2 1/4 C whole milk
2/3 C instant polenta
1/2 tsp red pepper flakes
1/2 cup good (2 year) grated parmigiano reggiano
1 T unsalted butter

Bring the milk to a boil in a heavy bottom saucepan. Add the polenta, pepper, and cheese whisking to combine. Turn the heat down to low and add butter at the time the polenta is the desired consistency. Whisk to combine and spoon onto plates.

Spoon polenta onto plates then short ribs and carrots on top. Drizzle cinnamon brown butter, a sprinkle of parmigiano, and pepper flakes on top and enjoy with a nice supple Primitivo.

Tuesday, September 7, 2010

Who says?


There are few things in life more rewarding than a tasty breakfast. Sadly, for most of us I think, we tend to miss out on the many joys offered by this one meal. The type of brekfast I'm referring to isn't the one doused in milk or peeled back from a plastic container. Despite my love for scones and the warm goodness they entail, nor is it a warm scone with homemade gooseberry jam (maybe I'll share that with you later, this summer's favorite new treat).  Those are all well and good, but the kind of breakfast I'm reminescing about with you today is the super traditional, capital b, Breakfast.

Nothing quite beats the traditional breakfast. While I can't (and know very people who can) have the bacon or sausage, some form of of eggs, and pancakes or waffles every morning, there are some mornings where I pine and yearn for the extra twenty minutes to perfume the air with frying bacon and to sink my teeth into the paradoxical crispy chewyness of the perfect waffle.

When such yearnings strike, its rather uncommon to actually be able to live up to and enjoy them that morning. Usually, I've sacrificed said breakfast for an extra twenty minutes of sleep, or for an early start on the Saturday morning bustle, and I have a feeling most of you probably have too. Luckily however, no one ever said breakfast isn't just as good for dinner. Hence the inspiration, for these:

These my friends aren't any ordinary waffles. To make them into a meal almost all on their own (that pair quite nicely with a summer goat cheese and arugula salad oddly enough), these guys take some extra care and devotion. First, they require a perfectly cooked piece of bacon Now, I'm a crispy bacon girl. I love bacon, but any sign of chewyness and I've lost my appetite. With these though, it's important first and foremost to fry them until barely crisp, meaning that the very edges should be crisp all the way around and starting to darken slightly, the middle should be firming up, but you don't want the super crispness on its way to burnt texture. They'll cook a teeny bity more when you get them into the waffle iron ad you don't want bacon pebbles.

Second, is timing. Breakfast is all about timing. Waking up early enough. Cooking the eggs at the appropriate time so they don't become rubber. Cooking the waffles at the right time so they don't become soggy, etc. This dish is no different. So, you'll want to cook your bacon, leaving enough time for the pan to cool slightly.This will ensure you don't make scrambled eggs in the waffle batter later.

Last, is variety. We were lucky enough on a recent trek to Cleveland to score an assortment of cheddar cheese cubes. Although I had envisioned an awesome grilled cheese out of it, this proved to be even more rewarding, giving just the touch of variety in each bite to keep you wanting more.

Bacon Waffles with Apples and Cheddar
1 3/4 cups all purpose flour
1 tablespoon brown sugar
1 1/2 teaspoons baking powder
1/2 teaspoon salt
1 3/4 cups whole milk
2 large eggs
4 tbsp bacon grease, cooled
2 tablespoons unsalted butter
6-8 pieces of bacon cooked until almost crisp and crumbled 
4 oz assorted cheddar cheeses (white, smoked, sharp, etc). 
2 Apples, sliced thin*

1. Prepare bacon as described. 
2. Preheat waffle iron as needed. Combine flour, baking powder, salt, and sugar. 
3. In a separate bowl, combine milk and eggs. Carefully whisk in melted butter and cooled bacon grease. 
4. Combine wet and dry ingredients, whisking to remove most lumps. 
5. Cook waffles per manufactures instructions, sprinkling with crumbled bacon before closing iron. 
6. When waffles are done, top with crumbled or shredded cheese while warm.
7. Top with apples.

* You can top the waffles with raw apples sliced thin for a fresher taste. For a truly decadent treat, saute them for a few minutes in the same pan you cooked the bacon in.

There's not much else to say here. It's simply a magical marriage of apple pie and cheddar, and a breakfast super waffle. Enjoy!

Tuesday, August 24, 2010

Pizza Night

Some weekends are so enjoyable you wish they would never end- and when Monday rolls around you wish Saturday was the day that followed. That sums up my sentiment at the moment. My brother flew into Columbus on Thursday to visit and we made the most of every meal and adventure. In fact the pizza night was a mixture of both from trying to find room to let the formed pizza dough rest to spilling an egg into the oven. If you're curious what it looks like to have dough resting on all open counters and inside the microwave or what egg smells like cooking on the door of an oven you should have been there. Well, minus the unpleasant egg smell.


Before he came up I planned a carnitas dinner and a pizza night since he is a big fan of both and to attempt better organization. Dawn had to work during the day while we had all the fun, which left the cooking and shopping responsibilities to me. And, as I told someone the other day, Columbus is a city of markets. From small chain grocery's and independent grocers to ethnic markets and corporate giants. If the ingredient is available in the country, for a population of just over three quarters of a million there is a good chance you can find it here.


Maybe it is due to the ingredient selection but I am an equal opportunity pizza topping guy. I am not going to gawk at people throwing something other than mozzarella and basil on a pie. I picked up some leeks, potatoes, and pepper bacon while at the market on Thursday. (It sounds more like the making of an Irish dinner than Italian, right?) Saturday I found some uber cool white sweet plums at the farmers market. In the fridge was a chunk of Romano cheese that goes well with a variety of pizza toppings. Throw in a few eggs that were mentioned in the earlier fiasco and in my book you have the making of a pretty darn good pizza night. Oh, and did I mention we watched Raging Bull while he was up too. You get the picture. It was an awesome weekend that I will remember for a long time.


Pizza Dough


3 C bread flour
1 C durum flour
1 T extra virgin olive oil plus more for coating the bowl
1 1/4 C filtered room temperature water (approximate, depending on humidity)
1 T honey
1 T active dry yeast


Dump all ingredients into a bowl and mix with a fork until it forms a shaggy shaggy ball. With a mixer and dough hook or by hand, knead ten minutes or until dough is shiny and smooth. Splash a drop of olive oil into the bowl to coat the dough ball and the sides of the bowl to keep it moist and from sticking too bad. 


At this point the dough can be frozen for a week or kept in the refrigerator for a couple days. Just bring to room temperature and let dough relax. This make ahead version works in a pinch because the dough still rises some in the fridge or has to come to room temperature and rise for a good hour out of the freezer. I made the dough and let it rise covered on the counter for four hours.  Stretch to the preferred thickness and cover with pizza toppings. I split the dough into fourths and sprinkled a mist of cornmeal on parchment paper and on top to roll it out extra thin with a rolling pin so it cooks up nice and crisp. Form a small lip, also known as the cornichone, which will swell nicely on the heated baking stone.


Plum and Bacon Pizza


6 pieces thick cut pepper bacon 
1 to 2 small white plums or purple, halved and thinly sliced
romano cheese, parmigiano reggiano, or hard cheese of your choice


Preheat pizza stone in a 550 degree oven for an hour. Cook some of the fat out of the bacon but not until it is crisp or it will burn while the pizza is cooking. Leaving the bacon somewhat soft also allows the fat to cook into the plums. The good thing about Romano is it adds flavor without detracting from the ingredients or crust. Spread plum slices out in a single layer and top with diced bacon and then cheese. Slide pizza on parchment paper onto pizza stone and cook for 5 minutes then broil for one to two minutes to crisp and enjoy.


Bacon, Egg, and Cheese Pizza


6 slices thick cut bacon
3 eggs
sprinkle of sel gris salt
romano cheese, parmigiano reggiano, or hard cheese of your choice


Preheat pizza stone in a 550 degree oven for an hour. Cook some of the fat out of the bacon but not until it is crisp or it will burn while the pizza is cooking. You can also cook the bacon crisp and sprinkle the bacon crumbles on top after cooking the pizza. Crack the eggs evenly out onto the pie, sprinkle diced bacon on top, and grate cheese on top. Slide pizza on parchment paper from peel onto baking stone. Cook for 4 minutes then broil for a little over a minute. Make sure not to cook too long or the yolks will become tough. Sprinkle salt on top and enjoy.


Leek and Potato Pizza


1 leek washed thoroughly and finely julienned, mostly white with some tender green
1 medium russet potato peeled and sliced thinly with mandoline
a few drops of extra virgin olive oil
sprinkle of coarse sea salt
romano cheese, parmigiano reggiano, or hard cheese of your choice


Preheat pizza stone in a 550 degree oven for an hour. Place potatoes evenly in a single layer on dough and sprinkle salt on top. Spread leek heavily on top of pizza and shake a few drops of olive oil for moisture. Grate cheese on top and slide pizza on parchment onto baking stone and cook five to six minutes. Broil for about two minutes or until cornichone is a deep walnut color and leek tips are just browned. Enjoy.

Monday, August 16, 2010

Broccoli Breakfast Blogaversery


Wow. It's hard to believe that it has only been a year since we decided to start sharing our kitchen adventures with the rest of the world. It seems as if most people who celebrate their first year cook something extravagent to share and celebrate. But instead of sharing the wonderful leg of lamb and buttermilk polenta meal we shared on our actual blogging anniversary, instead I opted for a throwback of some of our first pictures. In other words, giving you something completely unidentifiable, and highly questionable. At least this is slightly more focused than our first blogging attempts.The picture above is of a green egg salad by the way, just in case you were dying of curiosity.

 
Although the questionable picture is a small reminder of how far (some) of our pictures and hopefully our writing has come since the early days, the recipes really signify the beauty of the blogging world. Like so many of the recipes we've tried on our adventures, even something as simple as a scrambeled egg salad has bits and pieces of inspiration and techniques picked up from browsing the blogging world. One of the first factoids we came across when we started blogging was that you could actually use those huge stems of broccoli once you get done with the florets. All you have to do is peel them, and voila! This was somewhat of a revelation to us at the time, and maybe there's someone out there who is unaware of this now.


Over the last year we've gone on many adventures, from our Ohio Wine Dinner and Buitoni Dinner, to Daniel's two months of non-stop bread baking, and to the many culinary adventures we've been glad to pursue but haven't had the camera or time to turn into a post to share with you. Even when we don't share our posts with everyone, the feedback and encouragement we've received from you all has given us even more ambition and an ever growing desire to share our new adventures with you. So thanks!


Broccoli Pancakes (makes 4)
 2 Broccoli Stems, peeled and shredded, divided
2 tbsp olive oil
2 garlic cloves
1 egg
1/2 cup cornmeal
1/4 cup flour
1 tsp baking powder
1/2 cup buttermilk
1/2 tsp salt
1/4 tsp pepper
Additional oil for pan
Additional salt and pepper to taste

1. In food processor, puree all but 1/4 cup cup shredded broccoli with garlic cloves, and olive oil. Remove from processor and combine with one egg.
2. In a separate bowl, sift together cornmeal, flour, baking powder, salt and pepper. Combine with broccoli and egg mixture. Add buttermilk slowly to achieve right consistency.
3. Heat skillet over medium high heat with additional olive oil. When pan is hot, add half of reserved broccoli and divide in half. Quickly saute. When broccoli begins to brown , spread each pile into a thin layer and top each with 1/4 of the pancake batter. When batter begins to bubble, flip.
4. Repeat with remaining broccoli and pancake batter.

Green Egg Broccoli Salad

5 Eggs
2 Broccoli Stems, peeled and chopped
1 tbsp olive oil
1 garlic clove
2 tbsp buttermilk
salt and pepper to taste
1 medium sized carrot, peeled and shredded
1 tbsp soy sauce

1. In food processor, puree broccoli stems, olive oil, and garlic.Combine broccoli, eggs, and buttermilk and whisk quickly.
2. Heat skilled over medium heat. Add eggs and scramble, adding salt and pepper to taste.
3. When eggs are finished (they will be a different texture than regular scramble eggs because of the extra moisture from the broccoli), plate and top with a handful a carrots and a splash of soy sauce.

So, thanks for a great year!!! Let us know if there's anything you'd like to see on our blog in the next year so we can continue to grow and improve. Who knows where the next year will take us!

Saturday, August 7, 2010

Sailing Away


It sounds dreadful to be unhappy with summer weather. Almost like you are ungrateful to the fact that fresh produce is abundant and the sun is generally shining. I have a problem with, the lack of sunshine and the need to grill even during the dreary overcast days to trick myself into thinking the sun is out. Maybe it is a spoiled mindset from growing up in Florida, but I feel entitled to a certain allotment of UV rays every day during the dog days.

The other day when I was tricking myself that the sun was out and it would be marvelous to be sipping a Pimm's Cup and breathing quintessential charcoal fumes while the meat is marinating.  Instead, the weather was reminiscent of San Francisco haze but there was still chicken marinating and smoke trickling out of the Weber. In line with tricking myself there was sunlight trickling through the leaves of the trees, I planned a dinner with everything we love about summer- a salad highlighting cool fresh fruits and vegetables and spicy grilled meats as a counterbalance.

Jerk chicken is such a classic summer dish but sometimes classics should be updated to stay current and stylish. New peppers and new colors that change the whole outlook of the grilled bird. Departing from the familiar orange hue imparted by the Habanero peppers in the marinade, I switched it up a bit by adding Serrano's to elevate the marinade to an intriguing shade of green. This imparted a fresh heat alongside the musky bitterness of the ground allspice and cloves.

But what is a nice grilled piece of meat alone on a plate without an opposite or arch rival to show the strengths and differences. A cool bright salad of soft nectarines and mangoes with fresh tomatoes and cucumbers and crisp cabbage all laced with a peppery allspice vinaigrette. All superheroes begin in similar ways and the salad must marinate for optimum performance just like the moist heat of the chicken that brings to mind sunny days whether it is outside or not.

Emerald Jerk Chicken

1 3-5 # chicken cut in 8 pieces
3 serrano peppers, 1 deseeded
1 bunch green onions
5 garlic cloves
1 T allspice berries, ground
1/2 tsp cinnamon
1/2 tsp ground nutmeg
1/2 C extra virgin olive oil
1/4 C apple juice
5 grinds black pepper
a couple pinches of sea salt

After chicken has been cut into pieces, pulse all the marinade ingredients in a food processor until fully incorporated. It helps to grind the spices before everything is added together so they are ground fine enough. They can also be crushed in a mortar. Place chicken in a large glass bowl and pour marinade over and allow to marinate for at least an hour at room temperature or up to four hours refrigerated.

Grill over hardwood charcoal and wet mesquite chips until done (approximately 170 degrees) depending on heat of grill. Enjoy.  


Summer Salad
1 nectarine finely diced
1 mango 1/4 inch dice
2 C diced cabbage (1/2 large head)
1/2 cup finely diced cucumber
10 cherry tomatoes quartered

Vinaigrette
1 tsp. allspice berries ground
1/3 C. apple cider vinegar
3 T. extra virgin olive oil
a few grinds of pepper and sea salt to taste

Grind berries before pulsing vinaigrette. Then pulse the vinaigrette until all components are incorporated. Mix the vinaigrette well with the chopped salad and refrigerate at least an hour or up to a day for the flavors to meld. Enjoy the salad and chicken with a nice French Rose.